概要
AQS即AbstractQueuedSynchronizer,作为Java的JUC(java.util.concurrent)包的核心基础类,为其他并发容器、工具类提供了底层的实现基础。本文讲述AQS的实现原理,以及如何使用AQS。
AQS的实现
源码基于JDK1.8
没接触过的AQS的同学可能有点懵,不知道这是个什么东西。
我们看看官方文档的描述
Provides a framework for implementing blocking locks and related synchronizers (semaphores, events, etc) that rely on first-in-first-out (FIFO) wait queues. This class is designed to be a useful basis for most kinds of synchronizers that rely on a single atomic {@code int} value to represent state. Subclasses must define the protected methods that change this state, and which define what that state means in terms of this object being acquired or released. Given these, the other methods in this class carry out all queuing and blocking mechanics. Subclasses can maintain other state fields, but only the atomically updated {@code int} value manipulated using methods {@link #getState}, {@link#setState} and {@link #compareAndSetState} is tracked with respect to synchronization.
AbstractQueuedSynchronizer其实是一个抽象模板类,它底层主要是用了一个FIFO队列和一个int的状态,并提供了一系列方法给子类去获取锁和释放锁,来处理阻塞情况。这样说还是有点抽象,举个例ReentrantLock的lock()和unlock()方法最终还是用到AQS的获取锁和释放锁,如果还是不明白的话,把ReentrantLock的实现一起来看,就会清晰很多。
结构
先看看AQS整体的结构会对它的实现有很大帮助
官方描述
Wait queue node class.
The wait queue is a variant of a “CLH” (Craig, Landin, and
Hagersten) lock queue. CLH locks are normally used for
spinlocks. We instead use them for blocking synchronizers, but
use the same basic tactic of holding some of the control
information about a thread in the predecessor of its node. A”status” field in each node keeps track of whether a thread
should block. A node is signalled when its predecessor
releases. Each node of the queue otherwise serves as a
specific-notification-style monitor holding a single waiting
thread. The status field does NOT control whether threads are
granted locks etc though. A thread may try to acquire if it is
first in the queue. But being first does not guarantee success;
it only gives the right to contend. So the currently released
contender thread may need to rewait.
To enqueue into a CLH lock, you atomically splice it in as new
tail. To dequeue, you just set the head field.
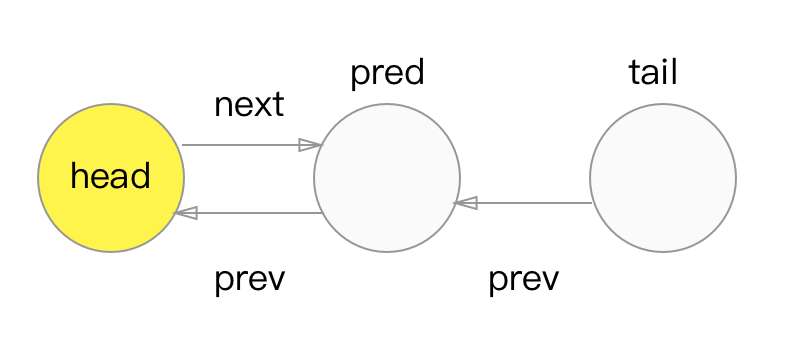
+——+ prev +—–+ +—–+
head | | <—- | | <—- | | tail
+——+ +—–+ +—–+
Insertion into a CLH queue requires only a single atomic
operation on “tail”, so there is a simple atomic point of
demarcation from unqueued to queued. Similarly, dequeuing
involves only updating the “head”. However, it takes a bit
more work for nodes to determine who their successors are,
in part to deal with possible cancellation due to timeouts
and interrupts.
大概可以看出一个FIFO队列,也叫CLH队列,从尾部加入新的节点,head节点是获取到资源,正在运行或运行完成的节点或初始化的dummy节点,head后面的节点是正在排队、被阻塞的节点。
Node
每一个节点是一个Node类型对象Node的属性
1 | //标记这个Node是共享模式 |
共享/独占模式
从Node的属性知道AQS分为exclusive独占模式和shared共享模式。所谓独占就是只能有一个线程进入到资源的临界区,其他线程需要排队等待;共享即允许多个线程进入临界区。最典型的就是读写锁ReentrantReadWriteLock,写操作是独占的,会block其他线程的读或写,而读操作与读操作则是不会block的。
AQS对exclusive和shared模式分别有对应的方法
1 | //独占模式 |
从命名看出,如果带上Shared字眼就是共享模式,不带就是独占模式;带有Interruptibly字眼的表示会响应中断,即如果线程被中断了,那么就会抛出InterruptedException,否则只会记录是否中断的标记会,然后继续处理;
独占模式和共享模式下的三个方法处理逻辑都是差不多的,我们重点分别讲acquire和acquireShared。
而其实acquire和acquireShared也是很类似的,所以接下来主要讲独占模式的acquire和release,但同时中间也会穿插说一下对共享模式的处理。
acquire获取锁
1 | public final void acquire(int arg) { |
tryAcquire方法是模版方法,由子类实现,因为怎样才算“获取锁成功”是由用户自己定义的,AQS做的只是当“获取锁不成功时”,把当前线程入队,即挂起。
继续
1 | private Node addWaiter(Node mode) { |
acquireQueued
1 | final boolean acquireQueued(final Node node, int arg) { |
“前驱节点是head,且获取锁成功”,这说明了head节点已经释放资源了(独占模式),当前节点可以获得锁。这也进一步说明了
- head节点不会自己主动释放掉,是由下一个节点把它干掉的
- 一定是head节点的下一个节点优先获得锁
继续看挂起的逻辑
1 | private static boolean shouldParkAfterFailedAcquire(Node pred, Node node) { |
如果pred.waitStatus不是SIGNAL的话,那么也没所谓,因为在下面的else分支会把waitStatus置为SIGNAL了,注意在acquireQueued中shouldParkAfterFailedAcquire可能会被循环执行,即在第二次执行时waitStatus已经为SIGNAL了。
1 | //如果前驱节点为SIGNAL时,则park挂起阻塞。 |
release释放锁
1 | public final boolean release(int arg) { |
跟tryAcquire一个道理,是否能够释放资源应该由用户来决定,AQS做的只是当前节点释放资源后,对队列的处理。
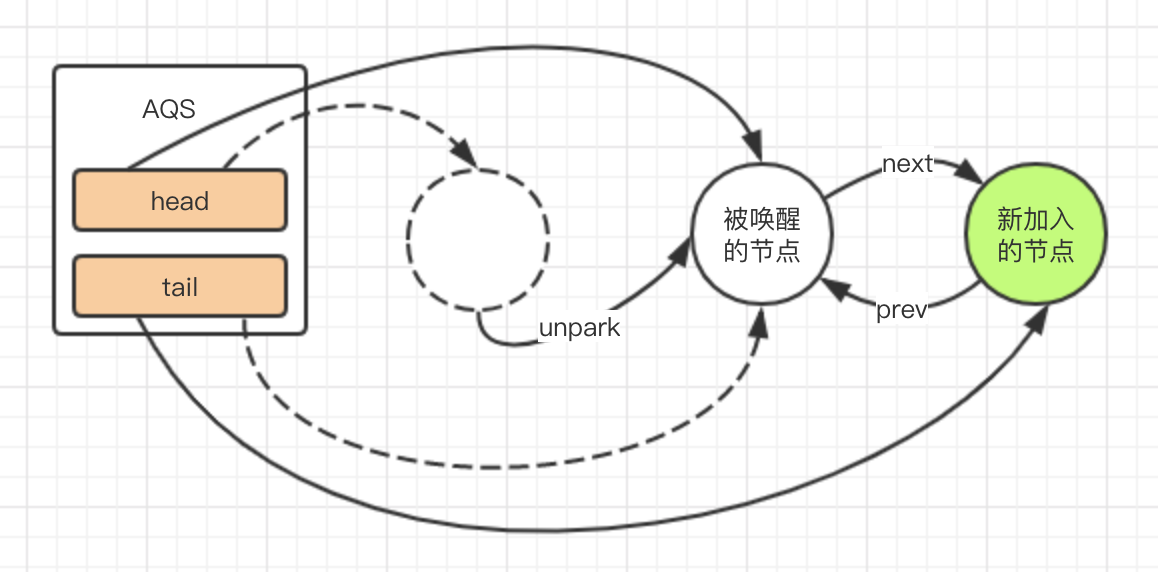
1 | private void unparkSuccessor(Node node) { |
unparkSuccessor从后往前遍历问题
这里相信大家有个疑问,为什么要从尾到头遍历,而不是从头开始?大家可以先思考一下
引用一段Doug lea的AQS论文
An AbstractQueuedSynchronizer queue node contains a next link to its successor. But because there are no applicable
techniques for lock-free atomic insertion of double-linked list nodes using compareAndSet, this link is not atomically set as part of insertion; it is simply assigned:
pred.next = node;
after the insertion. This is reflected in all usages. The next link is treated only as an optimized path. If a node’s successor doe not appear to exist (or appears to be cancelled) via its next field, it is always possible to start at the tail of the list and traverse backwards using the pred field to accurately check if there really is one.
要看懂这段话,我们需要看回addWaiter方法。意思就是当新节点加入到尾部时,compareAndSetTail和pred.next = node无法保证原子性,而在cas操作之前node.prev = pred是执行的,即prev指针可用,而next指针有可能为null,也就没法遍历到最新加进来的节点,如图所示
图解
因为懒,所以把acquire和release都画在同一个图上
shared共享模式
上面都是独占模式的代码,我们看看共享模式下有什么不同点。
acquireShared
1 | //跟acquire很像 |
由于tryAcquireShared返回是大于0的,所以propagate是大于0的。
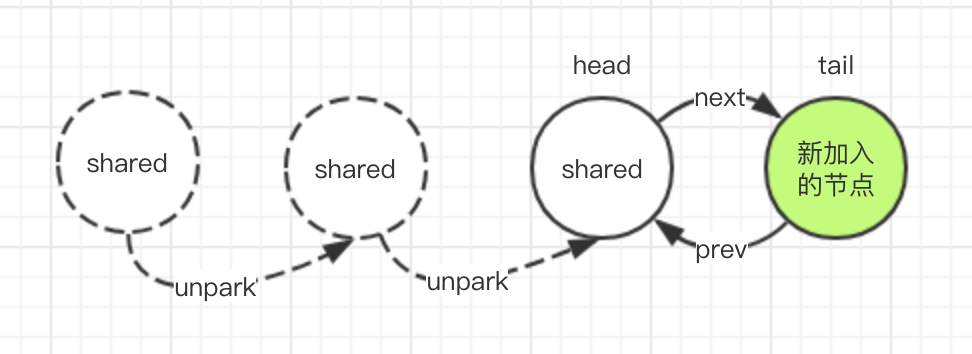
doReleaseShared
1 | private void doReleaseShared() { |
这里的代码比较难懂,需要说明一下:
- 如果
ws == Node.SIGNAL,说明当前节点需要唤醒后继节点,这没问题,为什么compareAndSetWaitStatus(h, Node.SIGNAL, 0)会失败呢?我们先继续往下看,假设cas成功了,那么会unpark后继节点,后继节点在doAcquireShared醒来后,会在setHeadAndPropagate做两件事,一是把head指向自己,二是还是调用doReleaseShared唤醒后继节点,那么这时候,就可能同时有多个线程去唤醒同一个节点,cas的操作就是要保证只有一个线程去成功唤醒。 - ws == 0,说明这是新加入的节点,如果
compareAndSetWaitStatus(h, 0, Node.PROPAGATE)失败,说明这时又有新的节点加入,把它的前驱节点,即当前节点设置为SIGNAL,即-1,(看shouldParkAfterFailedAcquire),那么这时需要重新从head开始,看看有没有可能去唤醒这个新加入的后继节点。 - 在第一点的时候就说了,可能会有很多线程在同时进行
doReleaseShared,而节点的唤醒会把head更新,head在不停的变化,在一直“往后”走,所以如果发现当h == head时,说明没有需要唤醒的后继节点了。
共享模式下的唤醒
AQS的使用
AQS是模板类,它主要实现了对CLH队列的入队、出队和唤醒、挂起操作,但是具体资源是如何分配的,那么这个是由子类决定的。
我们看看要成为AQS的子类,要实现最重要的几个方法
1 | //独占模式 |
从上述的源码,我们知道在进队列时会先调用tryAcquire或tryAcquireShared,返回true算获得锁成功,不会进队列,否则就会进队列等一系列操作。
至于上述几个方法具体要怎么写,我们可以看一下AQS的java doc文档,或者参考一下ReentrantLock,ReentrantReadWriteLock,CountDownLatch、CyclicBarrier这几个经典例子。
总结
AQS作为Java并发工具包的核心基础类,我们去了解和掌握它是非常必要的。
AQS使用CLH队列,通过Lock-Free算法,实现高并发的进队,出队操作。
AQS是抽象模板类,子类一定要覆盖几个核心的方法来完成对资源临界区的加锁和解锁操作。
AQS代码紧密严谨,简洁又美妙,能一行写出来绝不会写两行,几乎每一处的代码都可能跟其他地方有关联,这就是Doug Lea大神写出来代码。不过这引来一个问题,谁敢维护呢?
参考资料
http://novoland.github.io/%E5%B9%B6%E5%8F%91/2014/07/26/AQS%20%E5%92%8C%20%E9%AB%98%E7%BA%A7%E5%90%8C%E6%AD%A5%E5%99%A8.html
https://javadoop.com/post/AbstractQueuedSynchronizer