概要
Future是一种异步计算的模式,本文带你理解一下什么是Future,以及基本的FutureTask的实现原理。
作用
如果在一个方法中要执行另一个操作(任务),但是这个操作会耗时很久,而且你后面还需要用到这个操作的返回结果或者必须等到这个操作结束你才能走下去,你会怎样做?可能大家都会想到异步去执行,即新建一个线程去做这个事情,但是这样的话,你后面的操作就要放到这个异步线程那里,你的方法就变成异步的了,对你原来的返回造成了影响。
这时候,Future就发挥作用了,有些地方说它是一种模式,其实,它就是对一个异步操作的封装,它会返回一个“凭证”给你,你可以用这个“凭证”在需要的时候获取到这个异步操作的结果,一般来说这个“凭证”就是future。
原理
FutureTask就是Future的基本实现,下面我们就从代码分析一下实现的原理。
源码基本JDK1.8。
Future接口
我们先看看Future的定义,即你拿到这个“凭证”之后你能干点什么。
1 | public interface Future<V> { |
使用
如果没用过的,这里简单演示一下Future怎么使用,大家有个感性认识。
1 | private static ExecutorService threadPool = Executors.newCachedThreadPool(); |
继承关系
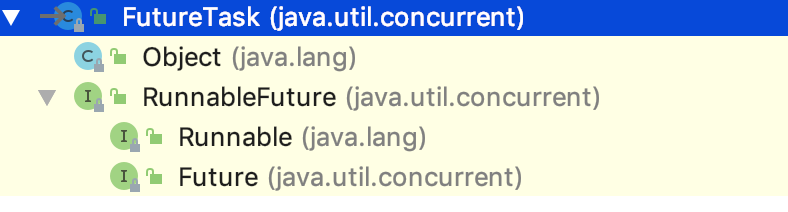
FutureTask是一个RunnableFuture,这个很好理解,就是Runnable+Future了。
提交任务
从任务的提交入手分析源码。
AbstractExecutorService的submit方法。
1 | public <T> Future<T> submit(Callable<T> task) { |
submit方法也是支持Runnable的。ExecutorService内部会把Runnable转成Callable,只不过Runnable的返回值为null。
FutureTask的属性/状态
先看下FutureTask的一些内部属性,才好了解它是怎么运行的。
1 | //重要属性“状态”state定义为volatile,为了在高并发下能够获取到最新的值 |
run方法
当这个RunnableFuture提交到线程池后,它做了什么。
1 | public void run() { |
值得注意的是,如果原来的callable任务运行异常了,那么在run方法中会直接catch掉,然后在get的时候才抛出来。这么也是为了做错误隔离,为了callable的异常不会影响到future的运行。
setException方法
1 | protected void setException(Throwable t) { |
set方法
1 | protected void set(V v) { |
setException方法和set方法都是protected,不能随意调用,不过子类可以改变它的行为。
COMPLETING状态?
在上面说到的7个状态中有一个COMPLETING的状态,它表示新建NEW和正常结束NORMAL或异常结束EXCEPTIONAL中间的这么一个状态,在set和setException用到了,会先把NEW状态更新为COMPLETING,再把COMPLETING更新为对应的结果状态。
刚开始我认为这个状态是没必要的。因为这个FutureTask只会有一个线程在运行它,不存在竞争,而且看代码也知道,作者没对竞争失败做处理,那么set和setException的CAS操作是肯定会成功的,所以我觉得把COMPLETING变成NEW也是可以的。但是细想如果直接把
1 | UNSAFE.compareAndSwapInt(this, stateOffset, NEW, COMPLETING) |
变成
1 | UNSAFE.compareAndSwapInt(this, stateOffset, NEW, NORMAL) |
但是后面还有一步赋值操作。
1 | outcome = v |
并发下,这时如果有其他线程在CAS后想获取结果,就返回null了。
finishCompletion方法
1 | //如果这个future正常结束,异常结束,被取消了,都会调用这个方法。 |
get方法
get方法是重点。
因为作者设计FutureTask是支持高并发的,而且用了Lock-Free无锁算法,所以阅读起来会比较费劲。
1 | public V get() throws InterruptedException, ExecutionException { |
WaitNode链表
继续看下去之前,先看看WaitNode的定义。
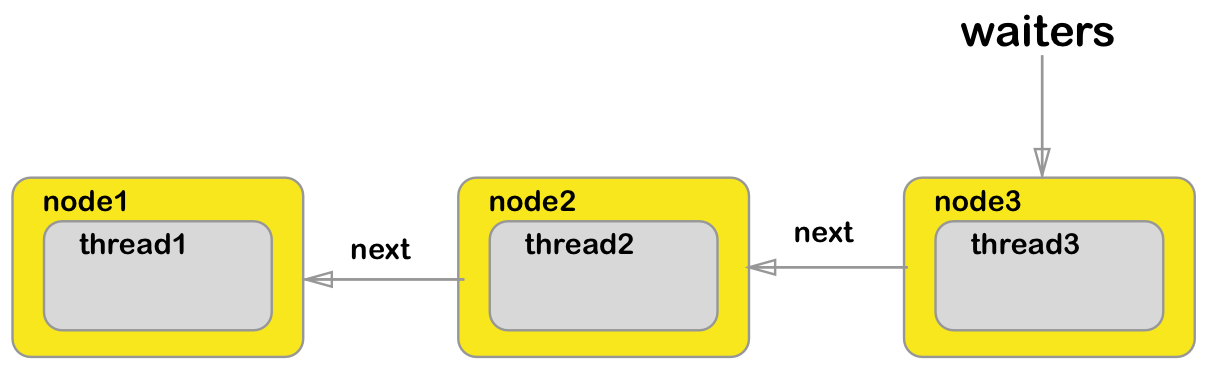
很简单,只有一个Thread和next指针。Thread就是指当前需要获取future结果的那个线程。WaitNode通过next指针形成一条链表。
1 | static final class WaitNode { |
这是在Lock-Free中常见的数据结构,看上去是不是有点像AQS呢?
1 | /* |
实际上,官方也说了,之前版本的实现是用了AQS的,原因是…(这个原因我不是很懂是啥意思),现在改为Treiber stack算法了。
awaitDone方法
1 | private int awaitDone(boolean timed, long nanos) |
awaitDone方法返回的是state状态的值。
要注意if else执行的顺序,先是判断中断状态,其次判断state的完成状态,再是新建节点,然后插入,最后才是挂起。用for循环去尝试当CAS失败的情况。
插入节点的只有这个方法,所以我们可以知道,链表的结构如下:
removeWaiter方法的作用是当中断或超时时移除当前的WaitNode。这个方法有点不好理解。
1 | private void removeWaiter(WaitNode node) { |
我们画个图,分情况来理解一下
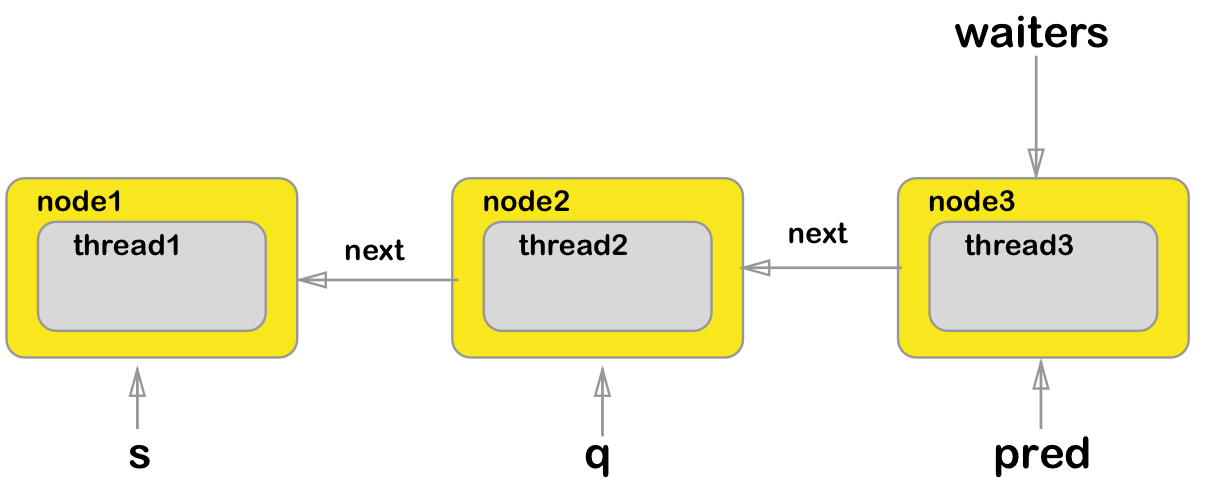
- 如果q.thread != null
因为进来时已经直接把node.thread = null,说明q已经不是当前的node,q是其他线程插入进来的node,这时需要把s,q,pred继续往左移动。 - 如果q.thread == null && pred != null
这时可以把pred的next指向s了,即删除了q。但是如果pred.thread == null,说明pred的线程也把它自己的节点删除了(删除节点的情况除了removeWaiter,还有正常获取结果后也会),所以pred已经没用了,需要重新来找到新的pred。 - 如果q.thread == null && pred == null
说明前面的节点都被删除了,已经没用了,把s直接置为头部。
report方法
比较简单了
1 | private V report(int s) throws ExecutionException { |
cancel方法
1 | //mayInterruptIfRunning参数,取消的同时可以中断runner线程的运行。 |
缺点
FutureTask有明显的下面两个缺点:
- 重复提交
并发会有重复提交的可能,虽然在内部有对状态NEW的判断,但那只是针对那个FutureTask实例的,我们看到,在submit方法中每次提交任务都会new 一个
FutureTask出来的。
不过现在已经有一个解决方案Memoizer
其实很简单,就是用一个key来记录这次的Future,然后放在一个Map里,下次用到时再从Map里取出来。
- 批量任务
Future每次只能提交一个任务,而且获取结果之前会一直阻塞,这点也是很不友好的。
综上,FutureTask只是提供了一个基本的功能实现,远远不能满足要求高的我们,guava的ListenableFuture和JDK1.8的CompletableFuture都是对Future的增强,前者提供监听器处理结果,后者更加强大,提供链式调用,同步、异步结果返回不同的组合方式来帮助你处理复杂的业务场景。
总结
源码部分已经介绍的7788了。因为采用了无锁算法,所以实现起来看上去代码比较复杂,看代码时要意识到这个,多想想在高并发下链表会出现怎样的情况,我没有把所有可能出现的情况都罗列出来,所以要靠读者自己多思考。
总的来说,Future通过循环判断state状态,挂起、唤醒线程的操作,来实现异步阻塞,通过一个WaitNode链表来处理并发的情况。